LC close button

605+ Cannabis Strains over 20 Breeders worldwide.

How to Germinate Weed Seeds: The Definitive Guide

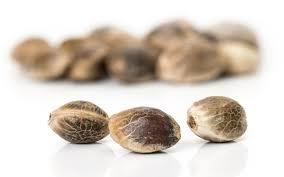
Germinating weed seeds refer to the process of making your seeds sprout, that is when white, little tendrils pop out of the seeds.

Your marijuana cultivation project usually starts with this process. It could be challenging if you are not familiar with the method just yet.

To help you out, read through this guide and learn more about the water soaking + paper towel germination method as the best way to germinate Cannabis Seeds.

Cannabis Seed Germination – Cup of Water + Paper Towel Germination Method

Image result for how to germinate weed seeds Cup of Water + Paper Towel Germination Method

Image Source

The cup of water + paper towel germination method is a tested way to germinate Cannabis Seeds. In this guide, we will discuss this process in detail.

Reminders

Before starting the germination process, it is best to prepare everything that you need, including your workspace. Make sure that all the tools are cleaned accordingly. This is to make sure that cross contamination is avoided. Also, it is important to ensure that all necessary materials are available.

Preparing a checklist would also help. Make sure that you have the following:

  • A glass/cup
  • A plate
  • Tweezers
  • Bottled Spring Water/Distilled Water
  • Absorbent Kitchen Paper Towels

For the water, make sure that you only use bottled spring water or distilled water. Boiling water does not help either. It only kills the germs but does not necessarily remove impurities.

For the absorbent kitchen paper towels, use the really absorbent ones, not Kleneex tissue.

Optional Step

To further encourage the seeds to start germinating, you may do light scuffing of the seeds. This can be done using fine sandpaper, or even an emery board. You may also opt to shake the seeds inside a pill bottle. This process will enable the outer shell to loosen it. At the same time, the water will be able to penetrate easier, thus starting the germination process accordingly, and earlier.

Fill a glass with water, leaving it to stagnate inside a room with a temperature higher than room temperature, specifically between 20 to 25 degrees Celsius.

Place the seeds into the glass and observe them as they float. Allow the seeds to soak for about 12 to 18 hours. Take note that the process of soaking the seeds is the most important step.

After soaking the seeds, check each of them, tapping gently with your finger. You may even see the seeds sinking to the bottom.

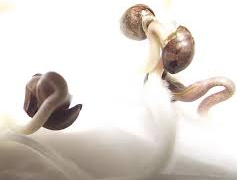
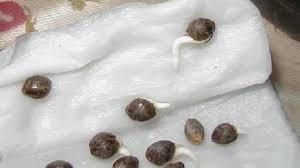
You may observe the seed shell cracking, with a small, white root starting to appear. This is the signal that the germination process now is starting. You may wonder how long to leave seeds in water. Leaving them for 14 to 18 hours is fine. Still, it is just fine if the shell has not yet cracked towards the end of this time period.

Take note that it is not advisable to soak your seeds in the cup for more than 18 hours. Also, the tap roots should be allowed to grow to a length reaching 3 cm to 1 inch.

Preparations

Image Source

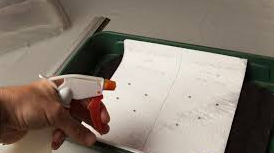
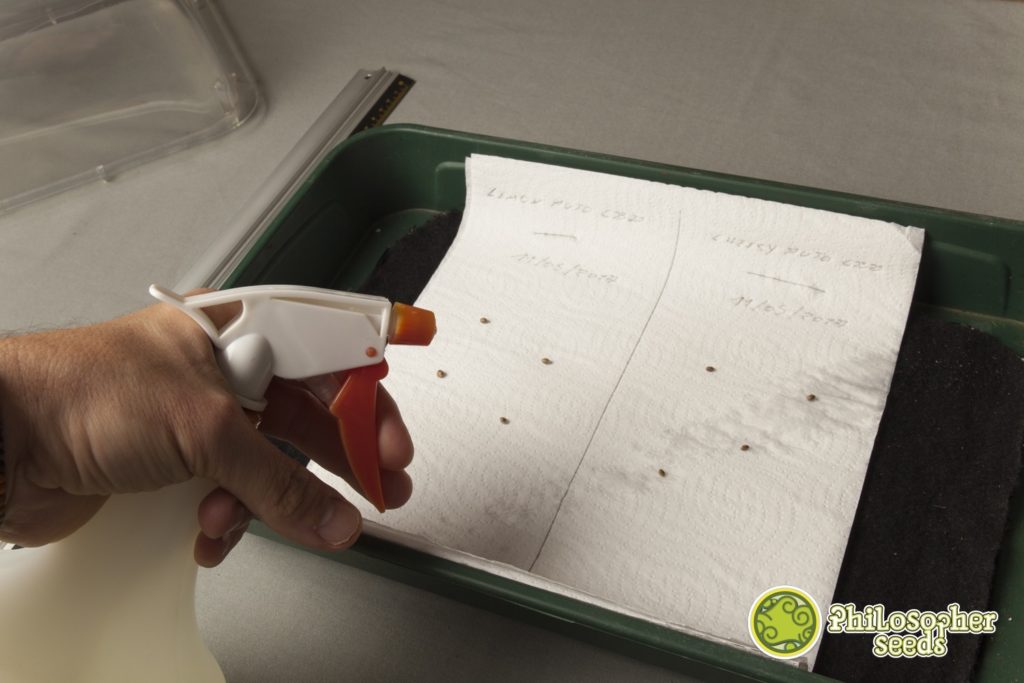
After seeing the seeds crack open, with white root forming, you can start using two or more paper towels in order to make a thick, folded layer on top of the plate. Using distilled rainwater, make sure to moisten the paper towels enough for them to be damp, but not soaking wet. If there is any excess water, make sure to drain them.

After 14 to 18 hours of soaking the paper towel, place the Cannabis Seeds between the two folded paper towels. Give enough space for the seeds in order to prevent the tangling of the new taproots.

The germination plate should be stored in a closed, dark space, but make sure to keep the layers moist. This can be done by dripping water at least every 5 to 12 hours. They just need to be kept wet, but not soaked.

Another thing that needs to be taken seriously is to make sure that the paper towels do not dry out. They need to stay moist. This may have to be given more depending on the humidity levels of the environment. This means the need to regularly check the dampness of the towels throughout the process.

Also, the plate with the completed germination should be placed away from direct sunlight. Rather, it should be placed on a heat source, a warm appliance perhaps, in order to help the seeds to absorb more water. The room temperature should stay at 21 to 29.4 degrees Celsius. With enough darkness, moisture, and warmth, better results are encouraged.

Important Notes

Image Source

It is very important to check the paper towels and the Cannabis Seeds at least twice or thrice a day for every 24 hours. During this period, make sure that you do not touch the seeds. Ensure that there is a proper moisture level in the towels, and wait for the taproots to surface.

If there is a need to touch the Cannabis Seeds, using tweezers is recommended. Take extra care in moving the seeds because they are so fragile at this stage that they can be damaged quite easily when transplanted or transported. The taproots should be especially untouched.

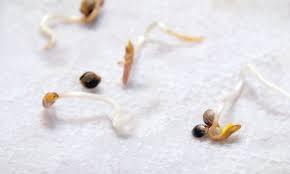
When the taproots reach about ¼ inch or ½ inch in length, the process of germination is now complete. The Cannabis Seeds are now ready for transplanting into the soil, with the taproot facing down.

Most of the seeds will begin germination within just 24 to 48 hours. However, there are some seeds that may take as long as a period of 7 days, mostly depending on the strain. So long as the directions mentioned above are followed, then you can expect up to 80% success in germination. This method has been designed to replicate the actual process that the seeds usually go through when grown in a natural environment.

Germinating Cannabis Seeds – Summary

Image Source

Before you start with germinating seeds, there are certain things that you need to take into consideration as something very important. For example, it is recommended by expert growers to use only bottled spring water.

With this said, you can now proceed with the process in germinating Cannabis Seeds.

Step 1: Prepare Your Seeds. First, place your seeds in a cup. Make sure that the water is at room temperature. This should be done for 14 to 18 hours. Since the seeds normally float, you can sink the seeds to the bottom of the cup using your fingers.

If you notice that some of the seeds do not sink, do not worry. This is just fine. It also does not matter at this point whether the seeds start cracking or remain uncracked. It is also advised not to PH your water, use water coming from a well, or use reverse osmosis.

Image result for paper towel germination cannabis prepare your seeds

Image Source

Step 2: Get two pieces of thick paper towels and place them on top of a dinner plate.

Step 3: Pour the seeds together with the water on the paper towel. Afterwards, fold the towel over the Cannabis Seeds to cover. Drain any excess water. This is a vital step to ensure that the seeds could feel air, moisture, and heat simultaneously.

Avoid putting the seeds in a drawer, cupboard, as well as other small, closed spaces. Doing this will only pose more difficulties for the seeds to crack and open.

Step 4: The seeds will start to crack open at this time. You will see a taproot beginning to develop. With this, you can allow the taproot to grow half a centimeter to three-quarters of an inch before you transplant the seeds.

C:\Users\Eva Mansueto\AppData\Local\Microsoft\Windows\INetCache\Content.MSO\D84BEA3C.tmp

Image Source

Note that the number of days in which the seeds will germinate may depend on the type of strain of the seeds that you are trying to grow. Still, it may take between 2 to 7 days to crack open.

At this point, it is recommended to use only plain soil for plotting. Avoid using nutrients on the soil, especially during the first three weeks of growing.

It is important to avoid covering the plate using another plate, a ziplock bag or plastic wrap. Doing so will only stop the free flow of oxygen as the weed seeds also require airflow, warmth, and moisture.

Possible Reasons for Germination Failure

C:\Users\Eva Mansueto\AppData\Local\Microsoft\Windows\INetCache\Content.MSO\93A74C72.tmp

Image Source

Since there is still a percentage of failure during the germination process, it is best to know what the possible reasons are.

  • The seeds should be allowed to sit on the paper towels for about 14 to 18 hours. If you fail to do so, perhaps removing them earlier, then the seeds will fail to germinate as the seeds were not soaked in the cup of water long enough.
  • Another reason for failure is if the paper towels end up either being too wet or too dry. The seeds could drown, or dehydrated.
  • The seeds can also die if the temperature in the place where you are placing them is too hot. This could also be the same if the temperature is too cold.
  • Avoid suffocating the seeds in plastic. Seeds also need air to breathe.
  • There is a possibility of failed germination if you are using tap water. Tap water often has too many impurities.

Emergency Germination

In such a case that your seeds end up failing to germinate, the reason is most likely due to lack of water. To save the process, make sure to drop the seeds in a cup of distilled water, leaving them right there until you start seeing a tap root surfacing. When it does, you can then start with the paper towel method until you notice that the tap root reaches ½ inch long.

Planting Your Germinated Weed Seeds

C:\Users\Eva Mansueto\AppData\Local\Microsoft\Windows\INetCache\Content.MSO\8FF3D550.tmp

Image Source

After seeing that the Cannabis Seeds have finally sprouted, it is very important to plant them right away. At this point, it is very important to make sure that you do not touch the taproots using your finger. If you do, the seed may still survive, but damage to the root may slow down or even stunt the growth of the seedling right from the start.

Plant with the Root Down

When you plant the seeds, do so in a way that the white root faces downward. The root should be about a knuckle deep into the growing medium. The top, on the other hand, should be just beneath the surface of the medium. Keep in mind that while the success rate of the paper towel germination method is high, there will be instances wherein you will lose a seed. Keep in mind that most of the time it has nothing to do with how you did it.

Within the first few weeks of germination, you may notice that some seeds start germinating right away, while others may take longer. There are a number of reasons behind this, ranging from the age of the seed to the temperature, and several others. Usually, the amount of time does not have to do with the health of the plants in the long run.

Once the seeds are planted safely, you can now start turning on your grow light. The heat that comes from the light source will also improve the germination rate, and it can also help the seedlings to open their leaves.

If there is a need to transplant the seeds from one pot to another, avoid doing so until you notice that they are already established well, and have at least a couple sets of nodes, or leaves. As suggested by some growers, planting the seedlings in a peat pot or solo cup is a good option so that they can just cut the cup away for easier transplanting.

Keep in mind, however, that moving the seedlings a lot may stress the plant, even stunting their growth. Too much of this stress can even cause your plant to die. Therefore, it is best to plan right from the start so that you can easily plant your seeds after germination without having to move them around a lot.  

How to Make Dry Ice Hash from Trim or Bud

Dry ice hash is one of the easiest and fastest ways that you can make hash from trim or bud. This method of extraction of that psychoactive resin from those awesome bugs is said to be the most efficient way to do so. Not only that, but it does not require you to use any solvents in the process.  Making dry ice hash from trim or bud not only helps you avoid inhaling any harmful chemicals but also allows you to have one of the smoothest and purest experiences of cannabis ever if done right.

Hash Potency and Purity

The potency of the hash is also dependent on the weed strain used and the extraction method used. Hash is definitely more potent than unprocessed buds. Note that hash purity varies as, in Europe, the confiscated hash during 2011 had 4 to 15% purity. This purity level was improved from 2000 to 2005 as the percentage of purity went up to 18. Note that purity means that the hash is free of adulterations such as plant material and other kinds of matter.

Concentrated Marijuana Resin

Note that the quality of the hash that you make is also highly dependent on the nugs. One great advantage of making hash is those lower quality buds will be extracted to become a concentrate that is a better form to take as it would require less consumption. Yet, keep in mind that the properties and medical benefits will still be the same. Hash is the buds separated to keep the precious resin to be kept in storage in that form. Be it indica, sativa, or a hybrid weed stain, the hash will be only good as the buds.

Making Hash is Easy

Now you may be thinking that making your own hash at home is difficult. You can do it if you approach it as a challenge that you can excel at. It truly is a breeze! And, what you will be making is a marijuana product that is so concentrated, just a little will go a long way to give a high that is that of world-renowned hash. You can even make your own hash according to weed strain!

Not a Chemical Process

You can make excellent hash and there is no need to have a science lab to do so. What you’ll require is easily available materials, a clean table to work on, a few minutes of your time, a bit of elbow grease, and of course, those fabulous buds to make into hash. And, using the dry ice hash method, you can use the dry ice again to make one to three batches of hash.

Hash Making

The process of separating the resin from the plant material has been done for hundreds of years. Here are a few other methods of making hash from trim or bud:

Charas

There is the making of small balls of hash that are known as charas. This is done with using the crude method of gathering the precious cannabis buds and then rubbing these between the hands. Then the sticky resin is collected and formed. This method may seem primitive but it works.

Drysift

This is the removal of dried plant material from the resin by using a screen to sieve it to become a powder. This drysift powder is also called ‘kief’. This powder is then processed further with the application of heat to make it into a hashish block. This block is pliable and gooey. This marijuana product is rather transparent and will melt if touched.

Chemical Separation

There is a chemical method of separation with the use of a solvent such as butane or ethanol to dissolve the resin from the buds. The plant material that does not dissolve will be filtered out and discarded. The solvent is subjected to the process of evaporation by being boiled so what will be left is the resin that is transformed into hash oil.

Why Make Dry Ice Hash?

There are many different ways of making hash. One of the more popular methods is with the use of butane as a solvent. Although this is pretty effective in extracting the resin from cannabis plants, there may be instances that traces of butane can be left in with the finished product. This makes it “tainted” and can leave you to inhale this harmful substance.

CO2 extraction or the dry ice method, on the other hand, allows you to get as much as of the cannabis resin as possible in the safest way there is. Not only that, but this process won’t pose too much danger in doing unlike with butane which is highly flammable.

Here are other reasons why making dry ice hash it the way to go:

It is Simple to Make

Dry ice hash is uncomplicated and very easy to make. You won’t need any expensive equipment at all to make it. You are basically just shaking a bucket to make it.

It Only Takes a Few Minutes

Other methods of making hash require the most part of your day to prepare. When you do it with dry ice, you can be done in just minutes. All you need to know is the right method and your bud or trimmings to be able to get your hash immediately.

You Can Use it Right Away

Making hash with dry ice avoids any moisture from seeping into the resin. This means that you can use the hash right after the process is over.

How to Handle Dry Ice

Before we go into how to make the hash, it is important that you know how to handle dry ice properly first. Dry ice is not dangerous at all there are just some precautions that you have to do to be sure that you are handling it properly. Because of its really low temperatures and it’s turning into gas, knowing these things are important.

  • First, you have to think about ventilation – Dry ice turns into CO2 when it evaporates so it’s best that you keep it in an area that has good ventilation to help you breathe. It’s really nice to see dry ice ‘smoke’ when this process happens.
  • Second, have some protection for your hands such as gloves when handling dry ice – The warmest temperature that dry ice has is  -190.3°F. If you use your bare hands to hold the ice, you can burn it quicker than putting it over a burning fire. Yes, dry ice will cause a kind of burn on the skin so be careful.
  • Third,  don’t use airtight containers – You want to avoid putting dry ice on these types of containers so that they won’t suddenly explode. This is because dry ice converts into CO2 very quickly so they need room to turn into gas.
  • Fourth, the last thing you have to know is that dry ice should be disposed of in the proper way – You can’t just put them down the drain since doing that will freeze your pipes. The proper manner to dispose of that the dry ice when it is used is to leave it in a well-ventilated area and allow them to disappear into gas.

Materials That You Need to Make Dry Ice Hash

  • Sanitized five-gallon bucket
  • Snow gloves or bbq gloves
  • Dry ice – 3lbs is needed about 6 ounces of hash
  • Hash bags, bubble bags, pollen bags, or mesh bags with small holes
  • Ground cannabis buds or trimmings
  • A credit card or an unused paint scraper
  • A large clean flat surface, tray, or plexiglass

How to Make Dry Ice Hash from Trim or Bud

  1. Place the ground marijuana and dry ice into the sanitized bucket. Just add it all in.
  2. Take the hash bag or any other kind of bag that you will use and fit it on the bucket opening. Make sure that if there is a mesh side, that it is correctly placed and is facing down to properly facilitate the filtering when the bucket is turned upside down.
  3. Pick up the bucket and slowly shake and swirl it. Do this for around 3 to 4 minutes. The movement will make the resinous stalks separate from the bud plant material.  Place the bucked down.
  4. Make sure that your clean surface, tray, or plexiglass is ready. Also, ensure that the bag covering the bucket opening is secure and will hold. Then, in one sure move, turn the cannabis and dry ice filled bucket upside down. This move will empty out the contents of the bucket into the bag. Simple but don’t make a mistake when you turn the bucket as all the stuff will fall onto a table or floor instead of into the bag.
  5. Once the bag has the contents of the bucket, hold the top part to close the ends. Then, start shaking the bag on the clean surface, tray, or plexiglass. Make sure that you are holding the bag securely. Keep on shaking. The resin will be filtered by the bag to drop onto the catch area.
  6. Keep on shaking the bag, making sure the dry ice is moving around so that the precious marijuana resin will fall. Stop shaking the bag when there is no longer any resin falling from it.
  7. Place the bag aside on top of a clean surface as you can use it again to filter more cannabis buds or trim if you plan to make more hash while the dry ice is still in good solid condition. If you don’t plan to make another batch, dispose of the used bag properly.
  8. Use a scraper or a credit card to gather the resin that is on that flat surface. You can push all the resin from the sides to make a neat pile in the middle of the area.
  9. Transfer the resin to a clean container.
  10. Repeat the process if you want to make hash using another weed stain by pouring the dry ice bag contents back into the bucket. Replace the hash bag.
  11. Repeat the process by pouring the dry ice bag contents back into the bucket. if you want to make hash using another hash bag with a different micron count.

Your dry ice hash from trim or bud is now ready to use!

About the Hash Bags

The mesh is important. The smaller the micron count of the mesh, the higher the quality of the marijuana product. A 73-micron hash bag is to be used to make golden kief which is hash resin in powdered form. If you use a 160-micron hash bag then there will be a bit more of plant material in the powder mix. If you are using other kinds of bags to make dry ice hash from trim or bud, just keep in mind, the smaller the holes used for filtering, the higher the quality of the hash that will be produced as it will have less plant material.

Don’t Cry Over Spilled Resin

Don’t gather any a dirty area as it has missed the tray or has fallen onto the floor as it will lessen the purity of your hash as that kind of resin you might want to save can be contaminated and adulterated, to spoil the quality of your DIY hash made using dry ice.

About Hash

Hash, also known as hashish, comes from the Arabic word that translates to the word “grass”. It basically is the essence of cannabis drawn out of the marijuana plant. Basically, it is the literal definition of cannabis concentrate and is also called cannabis resin.

The Very Essence of Marijuana

This is made out of the extraction of the trichomes, which are the stalker resin glands of the buds of a female cannabis plant. The resin is what holds all the medicinal cannabinoids and aromatic terpenes. These trichromes are the very essence of a marijuana plant. Since hash is derived from the buds of a  female marijuana plant, it does have the same properties. It is simply more powerful than smoking the buds as hashish mainly contains the resin.

How to Use Hash

It is difficult to smoke hash when rolled into a joint as it burns poorly. When rolling into a joint, the hash can be mixed with marijuana or tobacco so it will be easier to burn and smoke. Hash can be smoked using a pipe, bong, or herbal vaporizer.  It can be consumed orally as it is edible when it is in an oil form. Hash can be added to food when making edibles the proper way by subjecting the food item to heat, but make sure just to add a very small amount as it is a concentrate. Hash oil can also be added to food and drink to make it into edibles.

Enjoy using your own hash immediately after making it using dry ice!  

How to Trim Weed: A Complete Guide

One of the fundamental responsibilities of cultivating cannabis is how to properly trim and maintain its growth. You, as a grower, spends months in monitoring and maintaining for it to properly flower. Consider this as one of the responsibilities of growers they least like. Why? Trimming or manicuring your weed is not as easy as it seems but be grateful for this article for we have found ways on finding it rather enjoyable and adequate.

Why is it Essential to Trim your Weed?

The growth of weed is not as pretty as the way we see them in magazines and articles online. A well-manicured weed is indeed a good weed. When buds are left untrimmed, it does not look pleasant in the eye especially if you own a big dispensary. This way, it becomes appealing to people. It is not just for the sake of sales but to also avoid unnecessary growth within your buds.

Manicuring your weed improves your smoking experience. If the leaves are left untrimmed, there is a high probability that it will increase the harshness making it more difficult to smoke. To give you a better smoking experience, excessive leaves are removed improving the hit of the smoke through your throat.

In addition to this, manicuring your weed leaves you with potent buds. The excessive leaves growing within your buds are low in tetrahydrocannabinol levels. Incorporating these leaves to your bud will leave you getting less THC level for every gram you sell.

Studying the anatomy of a marijuana plant, the sugar leaves are best removed considering that it contains few trichomes in comparison to the nuggets. Manicuring your plant is a big help in exposing the part containing most of the trichomes.

An option we can provide if you do not want to waste the trimmed leaves, you can process and extract the cannabinoid content separately then incorporate it after. Tho, it would be best if you trim it well to produce premium quality cannabis buds.

What are the Techniques for an Efficient Trimming Process?

To make your cannabis cultivating life easier, we will be enumerating techniques that will provide efficiency during the trimming process. This would be suggested especially for the inexperienced growers who are trying to discover other ways on how they can make their growing experience progressive.

Reviewing these two, which is more suggested? It actually depends on your capability and environmental setting. Identify these and decide which trimming method will suit your situation. Whichever of the two you would prefer to use, you have to take into consideration your growing and manicuring capability as well as the environmental factors at risk. Both have advantages and disadvantages, but you have to proceed with the manicuring technique that works efficiently for you.

1. Dry Trimming Technique

Dry trimming technique is leaving your buds to dry in about four up to ten days. This way, the leaves have already curled and crisp making it easier to trim. This is preferred by growers living in dry environments since you just have to leave it and let it dry on its own plus it has its own benefits too.

There is no rush with the dry trimming technique since you will have to leave your buds to dry at a specified amount of time. It does not require much manpower too since there is an option to manicure it by machine.

If you have your own trimming machine, that would be your biggest advantage considering that it would not consume much effort and less stress.

Steps on How to Dry Trim Your Cannabis Plant

  1. Before drying your harvest, you have to remove the fan leaves first leaving the buds and sugar leaves. This way, the leaves that contain less to no trichomes would not be incorporated into your buds.
  2. During the drying or curing time, make sure that you do not stress your buds. Give it the time it requires for it to fully dry for it to give you a soothing smoking experience.
  3. Once it has totally dried up, this is when the manicuring process begins. Start the trimming from the dried branches from the buds. Cut the branches depending on how long would you want it to be. This method is also known as bucking down. Prepare a brown bag where you will be placing the amount trimmed in a day.
  4. Next step is filling your tray. Just place a handful on a tray not filling all the space to keep it organized. As the buds were trimmed based on your desired size, as much as possible, do not expose the stem. Since it is dried up, it tends to be more brittle that is why you have to make sure that you carefully trim the stem.
  5. After trimming the stem, the removal of the crow’s feet is next. The crow’s feet is similar to the appearance of a pitchfork.
  6. The final step is to just remove excessive plant matter produced during the manicuring. Keep your scissors sharp and clean to avoid the removal of the larger sections of the nuggets for it will result in the alleviation of your yield.
PROS CONS
It will give you a soothing smoking experience considering that the drying process withdraws the chlorophyll which makes the naturally bitter taste lessened. It does not require much effort and manpower since dry trimming can work on machines and there is no time to target. Its harvested flowers evenly dry in a week or two when properly hung. It is not efficient since it requires an average of one to two weeks for the drying process. It is difficult to manicure since the fan leaves and sugar leaves are curled up to its buds. Chances of development of mold are high especially on the part between the stalk and the flower. It requires a controlled environment to be processed.

2. Wet Trimming Technique

The process of wet trimming is when you do not leave the cannabis flowers to dry. You manicure the cannabis plant right away. The removal of the sugar and fan leaves are done right after harvest. This is considered by cannabis growers as the easiest way of trimming your cannabis plant since you no longer have to wait for a span of time designated for the drying process.

The wet trimming technique is time pressured. When you leave your buds right after harvest, there is a high probability that your buds’ growth will be affected. The good thing about it is that there is no additional process to do, you just have to trim it right after harvest.

Wet trimming is preferred taking into consideration the efficiency it provides. Cannabis growers believe that it would be best to trim the excessive leaves while it is still soft and moist.

Steps on How to Wet Trim Your Cannabis Plant

  1. Begin the method by harvesting your cannabis as soon as it flowers. Make sure that you leave the buds with its primary branches for it to be efficiently hung before undergoing the process of curing.
  2. Next, turn the plant upside down leaving the primary branches on the upper part to hang. This way, you will have easy access you get to clearly see and access the stems of the fan leaves.
  3. With the use of your trimming scissors, begin the manicuring by removing the fan leaves first since it contains less to no amount of resin. (If you want to recycle these, you can save it for later and use it as compost or just grind and smoke it as cigars)
  4. On a clean tray, scatter the buds and remove the smaller leaves or the sugar leaves. Be careful especially when trimming the stem. Work with sharp and clean trimming tools to come up with the desired finish.
  5. After you already have achieved spade-shaped buds, hang them again in a cool and dry area where the humidity is controlled in more or less 50%.
PROS CONS
It is an efficient method which does not require much time and effort. It is easier to trim considering that the flowers are still wet and moist making it easier to hold. Its buds are aesthetically pleasing. It does not consume much space since it would not undergo the drying process. There is a probability that the harvested cannabis flowers are not that aromatic or flavorful. The effort or man-power should be doubled since wet trimming is best while it is fresh from harvest. The development of molds is unavoidable because of excessive moisture.

What are the Tools Suggested for Trimming?

After the time invested in cultivating cannabis, the trimming process is yet another experience you would not want to miss. You do not just have to invest patience and determination in coming up with your desired buds but as well as money, time and energy. We all know that growing cannabis can be sensitive at times not just at the environmental settings but the interaction of grower to its plant.

Your best friends during the trimming processes are your tools which ought to be well-maintained too from its sharpness and its cleanliness. Whether you prefer to trim it by a tool or by machine, considering your personal preferences, use the trimming equipment that will make the manicuring process efficient and worth the while.

To come up with the best spade shaped bud, what are your best tools?

Hand-held Trimming

These are the different trimming equipment needed if you prefer to trim by hand.

1. Trimming Scissors

Your trimming scissors will do the trick and magic throughout the process of manicuring. The equipment responsible for cutting excessive leaves and unnecessary stalks. As a cultivator and trimmer, make sure that you do not use trimming scissors in removing thick branches because it does not just make it blunt but there is perfect equipment for trimming the primary branches.

2. Curved Blade Trimming Scissors

A type of trimming equipment with a long and curved blade which is composed of stainless steel responsible for trimming spots which are a bit difficult to reach. It would be best if you will be purchasing the one with a rubber handle to avoid sliding off and ruining your trimming process.

3. Small Scissors

The small scissors are similar to the appearance of sewing scissors. Its sharpness is perfect for the shaping of your buds removing excessive small leaves which are not suggested for other trimming scissors because of the size of the blade.

5. Pruning Shears

The pruning shears are somehow similar to the appearance of the curved blade trimming scissors. The blade of the pruning shears is curved too designated to cut big and thick stalks and stems. You use it to cut your stems based on your desired length before you start trimming.

6. Big Scissors

The big scissors are best in removing the fan leaves as well as the rough remains on the buds. This is for starting and for finishing your spade shaped buds.

Machine Operated Trimming

These are the three of the suggested machines for machine operated trimming.

1. TrimPro Rotor Red

A machine trimming equipment which is suggested for people who will be trimming large quantities of buds. It is best for professional growers who are time pressured when it comes to the trimming process. The good thing about it is that it is not messy to use because it has a plexiglass hood which keeps the debris within the machine.

2. iPower GLTRIMBOWL16M16-Inch Leaf Bowl Trimmer

If you are just going to trim a small number of buds, this is the machine trimmer that we suggest. The Leaf Bowl Trimmer’s speed can be adjusted depending on your personal preference. You do not have to worry about the blades being blunt. The sharpness of the blade of the Leaf Bowl Trimmer is equal to up to 30 pairs of scissors incorporated.

3. TRIM-DADDY Scissor Trimmer

A scissor powered by electricity that gives you the control over the amount you want to cut off knowing that for some scissors which are not electric, you tend to accidentally remove leaves which are essential to the plant.

Are You 18 Or Over?

Yes

Or

No By clicking yes, you certify that you are over 18. By using this website, you agree to our legal disclaimer.
× Chat Us with Whatsapp