Are You 18 Or Over?
YesOr
No By clicking yes, you certify that you are over 18. By using this website, you agree to our legal disclaimer.605+ Cannabis Strains over 20 Breeders worldwide.
Table of Contents

It can be a satisfying and therapeutic experience to cultivate marijuana plants. Marijuana often has various criteria and unique treatment instructions, close to the manner you maintain for crops. Any novice learns a lot of confounding and daunting knowledge from numerous websites. It still leaves them asking how to grow the correct kind of weed seeds.
There are more than 2000 marijuana strains, and gardeners may select between cultivating Indica, Sativa, or a hybrid marijuana plant. You must also select the correct kind of climate and soil, depending on the kind of plant or strain when you choose to produce. Also, there are different forms of tempering their development, and in different garden conditions, these plants may thrive.
The mechanism in which a new crop starts to emerge from the seed is germination. The first step in growing your cannabis cultivation is often known as the ‘popping’ germination. Cannabis Seeds can be obtained from several sources, and their consistency can differ.
It takes three things to germinate your marijuana seed: warmth, darkness, and moisture. We also provided a step by step overview of the most common cannabis seed germination process. To start germination, there are just only a few materials needed. But make sure that you have older, unregulated seeds or some that are partly dried out before continuing. Seeds that are younger and fresher do not need responsive germination and may be directly planted in a developing medium.
Step 1: Take 4 layers of paper towels and use filtered water to soak them. The sheets must be wet, but they should not run off with extra warmth.
Step 2: Take the two of the towels of paper and put them on a tray. Then, remove the weed seeds from each other at least an inch away and cover each with the two remaining sets of paper towels saturated with water.
Step 3: Take another tray to build a dark, safe area and turn it over to covering the seeds.
Step 4: Make sure the environment they’re held in is hot, around 70-90°F. Once these steps have been taken, it’s waiting time. You should inspect the paper towels and ensure they’re still soaked, so if they seem to have been losing the moisture, you should add more water and keep the seeds healthy.
Many seeds sprout very easily, although others can require more days. If the seed breaks and a new sprout emerges, you realize the seed has germinated. That’s the taproot, that would become the plant’s main core, and seeing it is a symbol of effective germination. Keeping this area sterile is essential, so don’t contact the seed or taproot because as the seed starts to break.
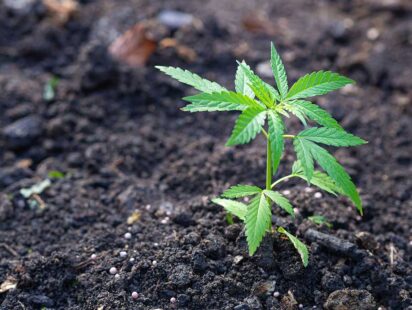
After the seeds have started growing they need to be planted. If you have used a form of germination that allows you to transfer the sprouts, as the taproot is quite delicate, do that gently. You wouldn’t want it to be touched. It will live whether you hit it or break it, but it will certainly stunt the growth of your plant. Drop the white root downward while planting. In the growing medium, around half an inch to an inch should be positioned (knuckle deep). Just below the surface should lie the top of the seed. Cover gently and encourage the seedling to burst through the soil for about two weeks (10 days highest possible). It could appear on the same day, but if it did not peek out for 10 days, it certainly did not thrive.
Do not panic if the seed is planted upside down unintentionally. Nature has a way where it will figure out itself. As long as there’s ample space for the roots to finally expand down, they can. Give him a little time to let him do his thing! Germination doesn’t need to be complicated. Are you ready for growth to begin? All begins with the proper seeds.
The time that green leaves cross, the photosynthesis of light starts in earnest. The plants are starting to metabolize, as well as the vegetative process has started.
Indoors: Lamps are adjusted to a light regime of 18 hours a day, 6 hours a night. It doesn’t need to sync with the real hours of daylight, you could adjust it to fit you at periods of the day. Loading electrical machinery can save you a great deal of money during off-peak hours.
Inorganic soil, the plants are satisfied or nutrients built for the vegetative process are fed to them. Often fan-forced breezes bring temperatures under check and make your young plants healthier. Exotic methods may be used to incorporate carbon dioxide into the air. Low-stress preparation and scragging may be used to improve indoor weed projected growth and flower production.
Outdoors: As daytime temperatures continue to rise through spring and then into summer, weed expands exponentially. During the vegetative process, infinite root room and strong genetics will see plants grow to 3 or 4 meters.
During the entire growth cycle, most contemporary plants are constantly topped and under-shucked. This promotes an even canopy that during the bloom process can fill with homogeneously sized buds. Although there are more than 12 hours of sunshine, weed can keep vegetating. The more you are from the equator, the less vegetation period your marijuana would have until it begins growing.
For the cannabis plant, blooming, planting, and budding both apply to the same process of development. As aromas begin to produce, the next few months are going to be exciting times. Unique flower arrangements that are relevant to your preference of strain are now beginning to appear. There are distinctive chapters in the flowering process that are common to all cannabis plants and begin when the foliage stops.
A notable shift in the development cycle arises at the very outset of the flowering process. The branch development starts to zig-zag and compact with little space between branches, instead of the striving and stretching symmetry of plants. There is a rather clear distinction.
In all plants, albeit for varying periods, flowering follows the same steps. Weeks before a long maturing Sativa, a fast Indica is cured and in the pipe. Proper flowers may begin to develop soon after differentiation. Calyxes will appear rapidly forming pistil-covered puffballs at branch internodes. In the young trichomes mostly on calyxes, pistils, and leaves surfaces, several desired resins are still developing.
Along with their spike, the puffballs of calyxes continue to extend. New fluorescent clusters and bud-specific leaves allow room for this. These latest leaves are thicker, narrower, sometimes deeply crinkled, and surrounded by trichomes, unlike sugar leaves. The swelling flower clusters gradually partly submerge them. These flower clusters multiply throughout the weeks and form large colas coated in swollen trichomes of resin. The calyxes as well as the trichomes expand with vast amounts of suitable resins remaining to grow more. Complete ripeness approaches soon.
Nutrients will be neglected during the past few weeks and your crops would be washed out of safe water. This assures a pure nutrient-free flavor and constructed salt aftertaste. The way to harvest is not fixed. Be comely and grow by doing so. Some may damp trim that extracts all the leaves when the plant is still intact, and more breaks down the plant. Supposed to hang branches to dry on a drying rack or holding single buds. Only after harvesting can some cut the large sugar leaves and hang the entire plant. There have been no fixed guidelines but for cautious handling. You want as least as possible to disrupt the fragile trichomes.
Dry your buds in a nice, dark position with very little moisture. Preferably, this is a very long phase that can require a minimum of 2 weeks. Small branches can quickly break when dry. There would also be slightly fluid dense branches. The chlorophyll has deteriorated and colors depending on species have been substituted with the green of development. As the bud’s true dry colors develop, tan, light green or even deep blue and purple will appear.
For the first 2 weeks, release the top or “burp” the container once a day. This activates built-up moisture that will cause your buds to mold. Only burp the container once a week once the flowers are dry to the touch. You don’t want to ruin weeks of diligent work with a lack of focus.
Now that you have reached the end of this growing guide, we hope that you’ll have a successful growing journey. Give us feedback and show us your beautiful buds after following all the steps. Happy planting!

[ez-toc] In indoor gardening, maintaining an optimal temperature within your grow tent is crucial for the health and productivity of your plant

[ez-toc] Welcome to the delightful world of cannafudge crafting, where sweetness meets sophistication, and cannabis infusion adds a unique twis

[ez-toc] You’ve finished trimming your weed, but what about those leftover stems? Don’t throw them away! These seemingly useless bits can a

Feeling high can be an exhilarating experience, but it's essential to make the most of it by engaging in activities that enhance the sensation a

[ez-toc] Starting with planting cannabis seeds might seem simple, but how deep should cannabis seeds be planted for them to grow well. In this

[ez-toc] In the realm of cultivating cannabis, maximizing growth during the flowering stage is a top priority for growers. While various method

[ez-toc] Nutrient burn is a common issue among plant enthusiasts, often resulting from over-fertilization or improper nutrient application. It

[ez-toc] Welcome to our complete guide to dealing with harmful pathogenic mold in cannabis. For those who grow cannabis, preventing mold is vit

In recent years, there has been speculation about “did Shakespeare smoke weed?” This idea originates from a study by South African anthropol

[ez-toc] Welcome to the hidden world beneath the soil – the inside of the marijuana root system. While the vibrant leaves and resinous flower

Are You 18 Or Over?
YesOr
No By clicking yes, you certify that you are over 18. By using this website, you agree to our legal disclaimer.