Is marijuana growing prohibited from where you are located? Are you planning to grow a stealth cannabis garden? You can choose from growing tents or growing cabinets which can accommodate a number of plants. But if you want a smaller growing space which offers a stealthier growing environment then you may try a space bucket.
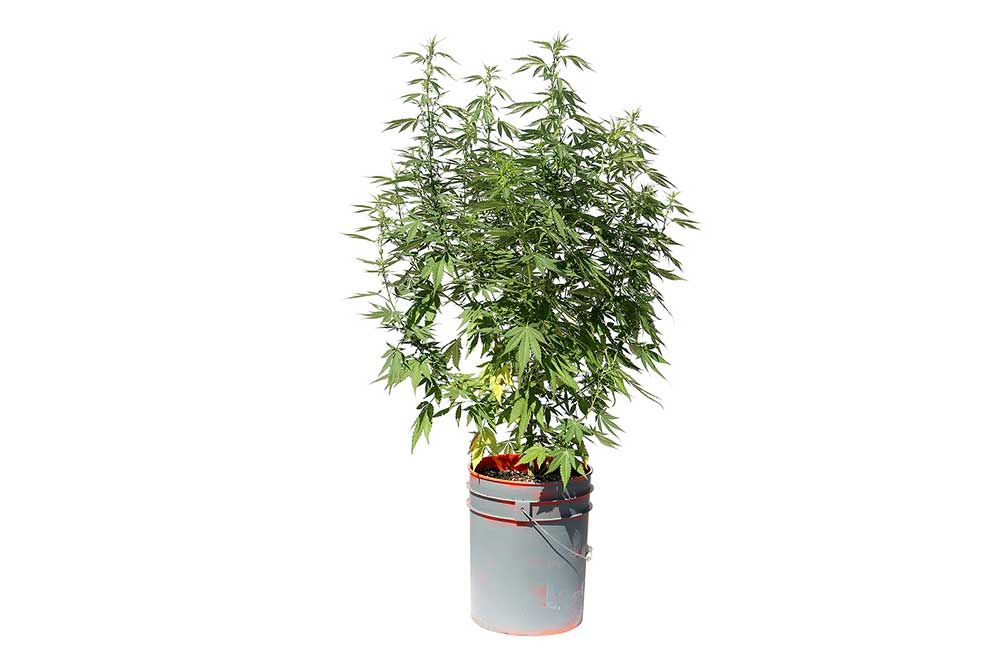
A space bucket looks like a stack of plastic buckets from the outside but waits till you see the inside. The small area is converted into a growing space just enough for one or two cannabis plants. Here, plants get all their growing needs.
Space buckets are buckets converted to small cannabis growing space. At the center is the space where plants can be stored, the sides hold the fans while the top is made deeper to hold the grow lights. Like a mini growing space, this can be easily taken anywhere and hidden anywhere too. No one will suspect that you are growing cannabis from old buckets in your garage!
And the best part of it all, space buckets are very cheap to make. You can actually use old items in your home to make your very first space bucket. Here is a tutorial for you.
Make Your Own Space Buckets Easy at Home
What You Need
1. 4 x 5 Gallon Buckets and One Lid
This tutorial will start with four buckets with 5 gallon capacities. You will stack these buckets to create a taller planter for your plants. This design is quite versatile because you can make the bucket taller or higher by just adding and stacking more buckets at the top. Usually, you need more buckets stacked on top of each other if you want to grow taller plants.
You can save money by buying these from a local store or you can use old buckets. Just clean these thoroughly and make sure that these are free from paint, dirt, and chemicals before using.
2. 6 x 23 w CFL Bulbs and Six E27 Sockets
This setup is ideal for young plants. Because young plants need more light, you can enhance this setup if you wish. However, you must be very careful since more light means increased temperature inside the space bucket. You can prevent this by adding another fan at the bottom or reducing the wattage of the bulbs.
3. 2 Small PC Fans and a 12v Power Supply
Usually, two PC fans are enough to reduce heat and improve humidity inside your space bucket but if this is inefficient and you want to add more light, you may use more fans.
4. Reflective Material
You need to install reflective material inside the space bucket to reflect light back to your plants. You may use white paint or Mylar sheets. Use tape or hot glue to install the reflective material.
5. Black Masking Tape
Install black masking tape or black paint outside the buckets to block out light and to keep any smell from escaping from inside the space bucket.
6. A Power Strip with Surge Protection
Rely only on quality and safety tested power strips. You can purchase this from local hardware stores or from online electronic stores.
7. A Standard 24 hr. Timer
A timer will help you accurately control lighting inside the space bucket. Lighting schedules are crucial in the life of regular cannabis plants and missing an hour or gaining an hour could mean a lot in the life of your plants. You can purchase 24-hour timers from local or online hardware stores.
8. Some Wire, Glue and other Tools
Instructions on How to Make Your First Space Bucket
Space buckets can be made in a few hours and even if you only know basic knowledge of electricity. But despite this, work cautiously and always use safe and efficient tools.
Building the Main Body of the Space Bucket
1. Create Holes on Your Buckets
Choose one bucket to be the main body of the space bucket. Preferably, the bucket should have no cracks, holes and is clean. Cut some holes at the bottom of the bucket. Use a drill or a hot iron to make holes.
2. Put Some Rocks Inside
Rocks will keep the bucket from clogging and from tipping over. Use medium-sized rocks. Clean the rocks by scrubbing with a soft brush and water before placing these inside the space bucket.
3. Install Reflective Material
Light = growth in plants and to improve light reflection, use reflective materials along the inner walls of the buckets. To install any material, use hot glue or very sticky packaging tapes. Make sure that the material is laid flat with no creases for efficient light reflection.
If you have white buckets, this covering is optional because white will already reflect light back to your plants. Do not use aluminum foil because this conducts electricity.
4. Cover the Outside of Your Space Bucket
Lightproof your space bucket by placing black tape or black paint too on the outside part of your buckets. This will block out light that can affect your plants when it is in a dark schedule. Placing tape or paint will also enhance the stealth appearance of your space bucket.
Create Space Bucket Exhaust System
1. Installing the PC Fans
The PC fans have two functions: one fan will deliver fresh air from the outside of the bucket to the inside and another fan will remove stale and smelly air inside and take it out.
To install the intake and outtake fans, cut 2 holes along the walls of the main bucket using a hot knife or hot iron to melt the plastic. You can further improve the size of your holes use pliers or saws.
The fans should fit nice and tight so that these won’t move. Understand that your plants will move slightly as these operate. Your fans should not move even when these are powered on all day.
2. Connect Fans to the Power Supply
Once the fans are in place, connect these fans to their 12 v power supply. The power supply should have the right amperage. If you are unsure how to wire PC fans to a power supply, look for wiring diagrams online. Use electrical tape to cover open wiring especially the connection from the fan to the power supply.
3. Improve Air Circulation
There are times when you have one PC fan that is bigger than the other. If this is the case use the bigger fan as the exhaust (the fan that pulls air out of the bucket). This is because removing hot air out of the space bucket is more effective rather than pushing cold and fresh air inside the container.
The outtake fan may be placed at the top where the lights are since lights emit a lot of heat. You may place an additional fan at the bottom of the bucket to remove stale air here as well since hot air tends to be heavier.
Where to get fans? You can recycle fans from old PCs instead of buying new ones. This type of fan is cheap to purchase too and you can buy these second hand as well. Always test second hand or recycled fans before using.
Installing Space Bucket Lighting
1. Design Your Space Bucket Lighting
The simplest space bucket will have to grow lights placed horizontally to maximize the amount of light that will shine on your plants. This efficient design will also reduce the amount of heat inside the container since it allows for only a few light sockets to fit along the cover of the bucket.
2. You May Add an Extra Exhaust Fan
As mentioned, it will become hotter when you add more lights or bulbs inside the space bucket. You have the option to add another PC fan to pull out hot air or you may increase the number of stacked buckets to place the lights higher.
3. Ready the Top Cover or Lid
Now you must add a bucket lid. The lid will also house the lights so it has to be a durable lid and should be at least several inches deeper. Place holes at the top of the lid where you will attach bulb sockets.
Wire the grow lights in parallel with the cable. If you are unsure about wiring this kind of system, check out safety diagrams online. Cover any exposed wire with electrical tape. You must observe electrical safety since water can condense inside the bucket easily after watering and this can cause an electric shock if you are not careful.
4. Add a Lid on Top for Additional Safety
After completing the wiring, glue a lid for additional safety and to enhance the stealth design of your space bucket. You may use different materials but never foil or any other conductive material. Just make sure not to cover any outtake fan ducts.
You may also make a light-top so you can install more CFL wattage inside your space bucket. This lets you install sideways bulbs to give your lights more room.
Installing the Power Strips
1. Glue the Power Strip on the Side of the Bucket
Use a strong hot glue to glue a power strip to the side of the bucket.
2. Connect the Electrical Equipment to the Power Strip
When the power strip is ready, connect the plug from the lights and the 12 v power supply for the fans on the power strip.
Height Adjustment Made Easy
1. Cut More Bucket Tops
Once your plants grow taller it’s only practical to increase the height of your space bucket. To do this, you need more bucket tops. Cut more bucket tops in case you’ll need this in the future.
Cut off the tops of all the buckets using a power saw or hand saw.
2. Stack the Bucket Tops
Stack the newly cut bucket tops to the top of the space bucket. As you increase the height of your buckets consider the height of the PC fans. The outtake fan at the top of the bucket should still be near the lights.
3. Improve Reflective Material Inside the Space Bucket
Now that your space bucket is higher, consider improving the reflective material along the inner walls of the bucket. Add Mylar sheets on top to cover the area created by the new bucket tops.
4. Lightproof the Outer Walls of the New Bucket Tops
Use black tape to cover the outer walls of the new bucket tops to block out any light that may shine through.
Put Your Plants Inside the Bucket and Light-proofing
1. Assemble the Plants Inside the Bucket
When your bucket is finished, you can now connect and assemble your plants. It is very important to consider the number of plants and the strain that you will grow inside this limited space.
Usually, smaller plants are recommended. It is also important to consider training your plants early using the screen of green method and topping to grow smaller plants with better yields.
2. Lightproof Your Space Bucket
Use black tape or black paint to cover any holes. If you are satisfied with the space bucket height, you may now add paint or decorative prints on the outer portion of the bucket to disguise it.
3. Ready the Power Strip
If you satisfied with the position of your power strip, you may now plug in your lights, timer, power supply for the fans and any other electrical equipment you plan to install. Take note of a safe position for the power strip: as much as possible, install it near the bucket where it can get wet. It has to be in an area free of moisture as well.
Plug the power strip cord to a safe and working power outlet. Consider that you will surely be keeping your space bucket in an area like your garage, basement or attic. Check the condition of the power outlets inside your room before use to make sure that everything is safe.
4. Thinking of Upgrades for Your Space Bucket
What’s great about a space bucket is that it is upgradable and expandable. There are a lot of enhancements starting with the lighting, fans, height of the bucket, etc. Plan any upgrade carefully and consider safety beforehand.
Some Upgrades for Your Space Bucket
Enhance Your Lighting with LED Grow Lights
An LED lamp is possibly one of the most important upgrades you should consider. LED bulbs are quite expensive but using it is quite cheap therefore you would get more value out of your purchase. The most commonly used LED lights for a very small space like a space bucket is a 3 x 3 watt high-powered LED module. This will let you focus enough light to your plants.
For safety, look for professional wiring instructions for specific LED modules online. If you are using an LED spotlight, use strong wood to make legs so you can prop up your LED spotlights inside the small growing space.
Although LED lights are the most expensive, the price of buying one will be augmented as you use it. These bulbs will burn longer, will shine brighter and are also cost-efficient. You can use two or three LED bulbs inside your small growing area, provide the best lighting BUT won’t cost too much.
Easy Watering System
Your cannabis plants will have to be watered regularly but to do so, you need to open the bucket lid and interrupt the light or darkness. The best way to go about this is to update your space bucket with a safer, simple and more efficient watering system that uses gravity.
Gravity will help push water out of a hose that will be placed inside the bucket. All you need to do is to cut a hole on the side and put the hose through it. The hose should be angled to allow water to drip continuously from a water reservoir located at the top of the space bucket.
This hose will be attached to a container and this will be placed on a shelf directly at the top of the bucket. You can install a valve to control the amount of water that will drip to your plants.
Training Your Space Bucket Plants
Space buckets are small and therefore only one to two small plants will fit inside this limited space. It is therefore recommended that you use training techniques to help keep your plants small but productive. You may use the screen of green technique, topping and fimming on your space bucket plants.
LST or low-stress training can help. Simple techniques like tying the branches to the sides of the space bucket can also help maintain the height of your plants. But of course, you need to start with a cannabis strain that won’t grow tall and out of control.
Just a few suggestions are Hindu Kush, White Widow, AK-47, Northern Lights, and Amnesia Haze. Not only are these strains manageable in a small growing space but these respond well to training and will give you better yields compared to other indoor strains.
Remember Odor Control
Odor control can be a challenge especially when you are working with strains that can give off a lot of odor. PC fans are generally inefficient when removing strong smells. The best way is to use carbon scrubbers or a carbon filter.
You can also prevent odor by cultivating only low-odor strains. There are many low odor cannabis strains in the market like Northern Lights. Remember that this strain is perfect for small indoor spaces because it is a small plant. And because it’s a low odor as well, this strain is no doubt the perfect strain for space bucket growing.
How to Water Plants Inside Space Buckets
Watering your plant is crucial for its growth and development. Experts have different takes to watering cannabis plants inside space buckets. Some teach the traditional two-knuckle rule.
Stick your index finger in the soil. If the soil feels dry to the second knuckle then you may water your plants. If the soil is wet or moist then wait till the soil is dry before you water.
If you want a more updated way to determine if your plants need to be watered, then use a moisture probe. A moisture probe is a device/tool that is inserted in the soil to determine the moisture level of the soil. You can also use this tool to prevent mold and mildew growth inside your space bucket.
Holding and lifting the growing container of your plants is one way to tell if these need to be watered. If you find the container lighter then it’s time to water. A heavier container means that water is still trapped in soil and needs to evaporate.
Water your plants every 3 or 4 days depending on their moisture levels. Water only when the soil is dry. The weight of the container is also a good indicator. It the container feels lighter than usual then it’s time to water.
How to Measure pH
It’s very important to maintain soil and water pH. Any acid or base readings can cause serious problems in the uptake of nutrients in the roots of your plants. Ideally, the soil and water should have a neutral pH of 6.6.
If the pH is higher or lower some important nutrients are converted into solid precipitates in the soil. These precipitates may also combine with other elements causing more problems with plants. Your cannabis plants may also suffer from nutrient problems because they won’t be able to efficiently absorb minerals from the roots.
The most common way to test soil and water pH is to use a test strip. Test strips are very cheap and are very accurate at +/- 0.1 when the strip is viewed under proper lighting. Test strips do not need any calibration and you don’t need any special device to read test strips.
You may also use digital meters to measure pH. One efficient, updated meter is the glass bulb ISFET version. This meter is very accurate that even a single drop of the test sample may be read accurately.
Tap water has 7-8 pH and this may vary depending on where you live. You may need to adjust the pH of water before you give this to your cannabis plants. Do not forget to do this because if the pH of the water is too high or too low, there are terrible consequences for your plants.
Correcting pH is possible by using products available from local garden stores. You may also find these products from online cannabis growing shops. If you are new to growing cannabis, do not try to correct the soil or water pH yourself because any mistake can ruin your plants.
The Right Soil and Nutrients
Is there a type of soil that will work best with space bucket growing? A good organic soil that contains mycorrhizae is a good growing medium for growing cannabis plants indoors. This kind of soil is also rich in nitrogen, potassium and phosphorous and trace minerals.
Even good growing soil needs to be augmented with perlite and some dolomite lime. Perlite will improve the drainage of water and nutrients while dolomite will help prevent Ca/Mg deficiencies
Nutrients According to the Plant’s Developmental Stages
During the vegetative stage, your plants need a fertilizer mix that has more nitrogen to help grow more leaves, stems, and branches. For the flowering stage plants need mixes that contain more potassium and phosphorous for improved bud growth. It won’t need nitrogen because, at this phase, it will cease to grow.
Your space bucket plants should already be in their final growing pots. Transplanting from a small growing medium to a larger one should be done early at the vegetative stage. When using nutrients, please do not use anything that’s labeled time release.
Remember that when you use fertilizers and nutrients, it is better to give less compared to killing your plants when you give too much. There are many dangers of overfeeding your plants like nutrient burning and osmosis problems. Osmosis is a natural process in plants, but it can be quickened when the soil becomes acidic or basic. Osmosis is seen in the leaves of the plants. The tips of the leaves burn and turn white before turning brown. And even if you correct pH imbalance, the discolored leaves will never return to their original color.
Space buckets are easier to maintain than larger growing tents and cabinets. With just a small space and only one to two plants, you will easily spot nutrient problems and correct these early on. Aside from these advantages, you will also be able to hide your plants from prying eyes. Who would suspect that a stack of buckets holds a living, thriving cannabis plants? So if you only plan to grow a few marijuana plants and you want to hide your plants form everyone, then you must consider growing cannabis using space buckets.


Excellent blog here Also your website loads up very fast What web host are you using Can I get your affiliate link to your host I wish my web site loaded up as quickly as yours lol
Your writing is not only informative but also incredibly inspiring. You have a knack for sparking curiosity and encouraging critical thinking. Thank you for being such a positive influence!
Simply wish to say your article is as amazing The clearness in your post is just nice and i could assume youre an expert on this subject Well with your permission let me to grab your feed to keep updated with forthcoming post Thanks a million and please carry on the gratifying work
Somebody essentially lend a hand to make significantly articles Id state That is the very first time I frequented your website page and up to now I surprised with the research you made to make this actual submit amazing Wonderful task
Your blog is a beacon of light in the often murky waters of online content. Your thoughtful analysis and insightful commentary never fail to leave a lasting impression. Keep up the amazing work!
Thank you for the auspicious writeup It in fact was a amusement account it Look advanced to more added agreeable from you By the way how could we communicate
Your blog is a constant source of inspiration for me. Your passion for your subject matter shines through in every post, and it’s clear that you genuinely care about making a positive impact on your readers.
Your blog is a constant source of inspiration for me. Your passion for your subject matter is palpable, and it’s clear that you pour your heart and soul into every post. Keep up the incredible work!
Your articles never fail to captivate me. Each one is a testament to your expertise and dedication to your craft. Thank you for sharing your wisdom with the world.
Your blog is a testament to your dedication to your craft. Your commitment to excellence is evident in every aspect of your writing. Thank you for being such a positive influence in the online community.
Your writing has a way of resonating with me on a deep level. I appreciate the honesty and authenticity you bring to every post. Thank you for sharing your journey with us.
Your blog is a true gem in the world of online content. I’m continually impressed by the depth of your research and the clarity of your writing. Thank you for sharing your wisdom with us.
Hi i think that i saw you visited my web site thus i came to Return the favore Im attempting to find things to enhance my siteI suppose its ok to use a few of your ideas
Somebody essentially help to make significantly articles Id state This is the first time I frequented your web page and up to now I surprised with the research you made to make this actual post incredible Fantastic job
Usually I do not read article on blogs however I would like to say that this writeup very compelled me to take a look at and do so Your writing taste has been amazed me Thanks quite nice post
Your blog has quickly become one of my favorites. Your writing is both insightful and thought-provoking, and I always come away from your posts feeling inspired. Keep up the phenomenal work!
Every time I visit your website, I’m greeted with thought-provoking content and impeccable writing. You truly have a gift for articulating complex ideas in a clear and engaging manner.
Hey there You have done a fantastic job I will certainly digg it and personally recommend to my friends Im confident theyll be benefited from this site
I have read some excellent stuff here Definitely value bookmarking for revisiting I wonder how much effort you put to make the sort of excellent informative website
Nice blog here Also your site loads up very fast What host are you using Can I get your affiliate link to your host I wish my site loaded up as quickly as yours lol
What i do not understood is in truth how you are not actually a lot more smartlyliked than you may be now You are very intelligent You realize therefore significantly in the case of this topic produced me individually imagine it from numerous numerous angles Its like men and women dont seem to be fascinated until it is one thing to do with Woman gaga Your own stuffs nice All the time care for it up
Your blog is a beacon of light in the often murky waters of online content. Your thoughtful analysis and insightful commentary never fail to leave a lasting impression. Keep up the amazing work!
Your blog is a breath of fresh air in the often stagnant world of online content. Your thoughtful analysis and insightful commentary never fail to leave a lasting impression. Thank you for sharing your wisdom with us.
Your blog is a beacon of light in the often murky waters of online content. Your thoughtful analysis and insightful commentary never fail to leave a lasting impression. Keep up the amazing work!
Usually I do not read article on blogs however I would like to say that this writeup very compelled me to take a look at and do it Your writing style has been amazed me Thank you very nice article
Your writing has a way of resonating with me on a deep level. I appreciate the honesty and authenticity you bring to every post. Thank you for sharing your journey with us.
This hydroponics guide is quite the buzz, seriously! Who knew growing weed without dirt could be so complicated yet potentially rewarding? The breakdown of systems like DWC and NFT is helpful, though I suspect my cat might confuse the air pump for a toy. The idea of cleaner buds is tempting, especially since explaining hydro weed to my non-growing friends might get messy. And the bit about potential dizziness from hydro weed? Perfect, now I have an excuse for why I always stumble a bit after a grow session. Still, the promise of faster grows and higher yields is hard to ignore, even if it means more trips to the pH meter than to the coffee shop. Overall, a cultivating read for the curious grower!